
13 Tips for Painting a Mural (With Video)
How I Booked My First Mural
In spring of 2021 I was able to check an item off my bucket list: paint a mural! It began after I saw a segment on the local news about the Phoenix Mural Project, where they interviewed the founder, ASU design professor Danielle Fousheé. I’d been wanting to try a mural for a while, so I reached out to Danielle to see if she had any spots open, gave her a little bit of my background and linked to my portfolio. I was so excited when she responded that she thought my style would be a perfect fit!
(Video below.)
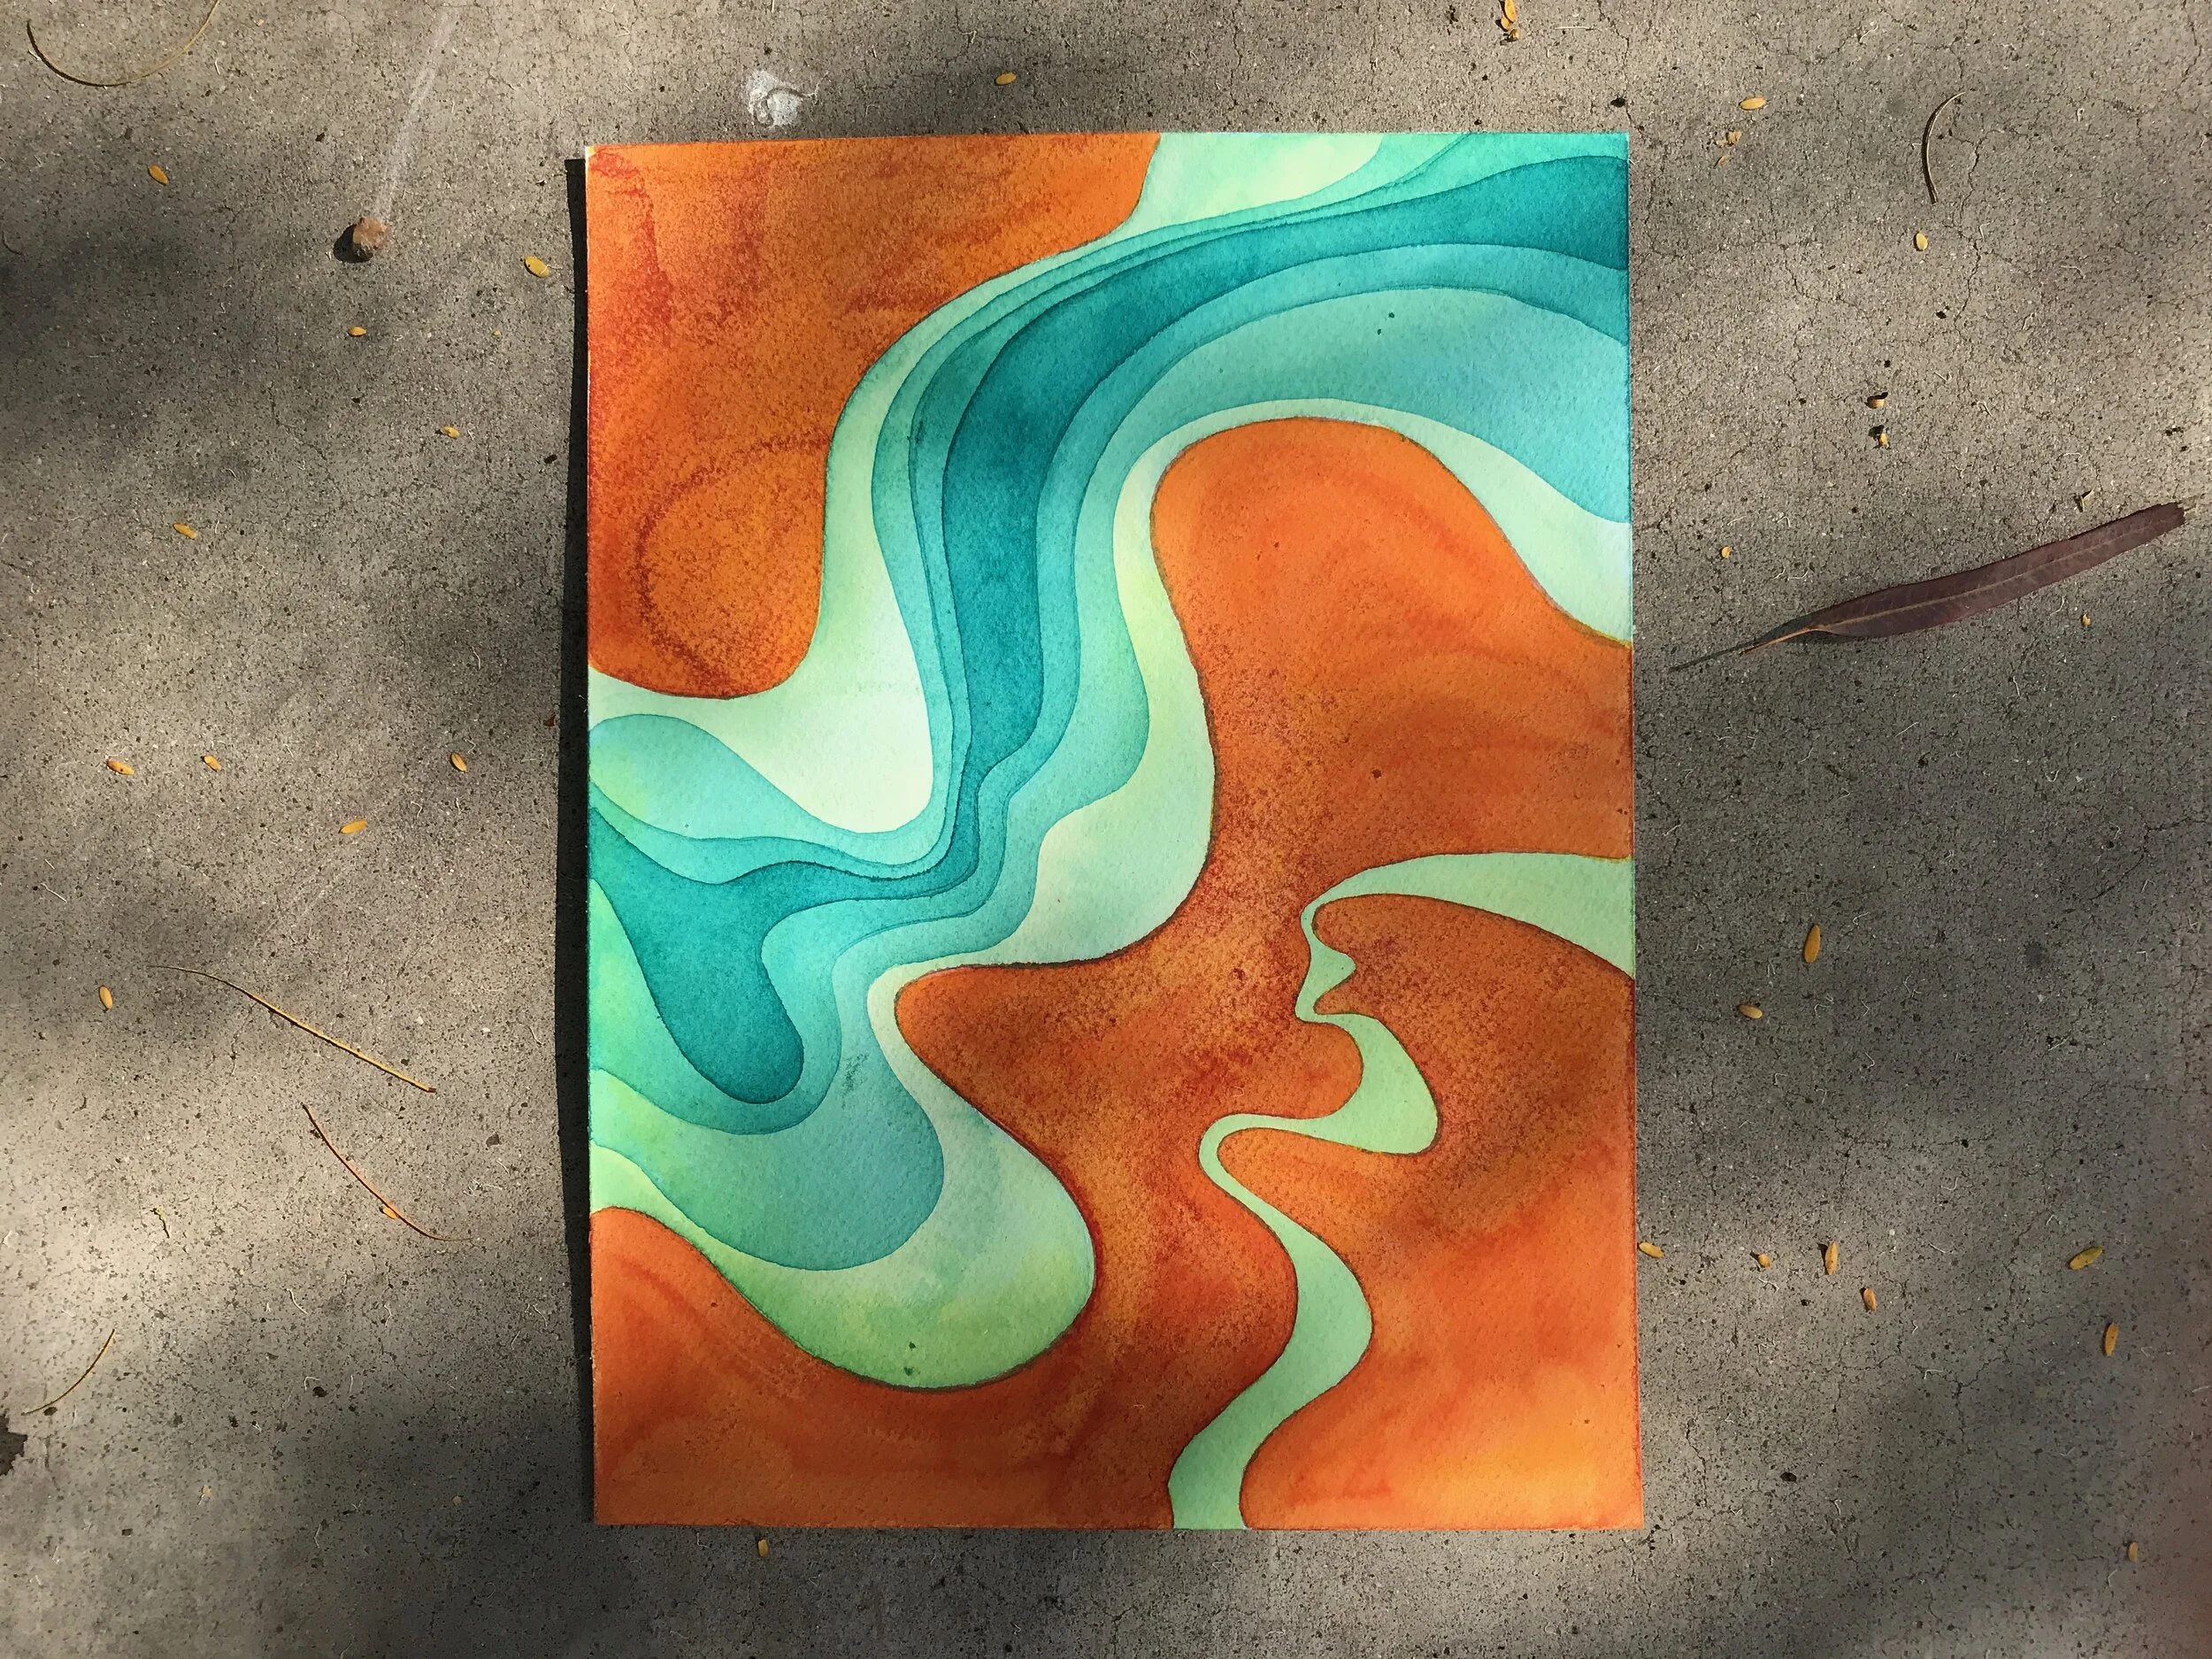
Like a River
Start with a Sketch of Your Idea
The theme of this year’s mural fest was sustainability. I had previously painted a small watercolor abstract painting (Like a River, above). That painting is based on topographical images of the Colorado River near Lee’s Ferry, Arizona, and I decided to take my mural from this idea. The flowy shapes and contrasting colors would be eye-catching and fun to paint. I also wanted to include text, and the mural would be horizontal instead of vertical, so I needed to work it out in my sketchbook.
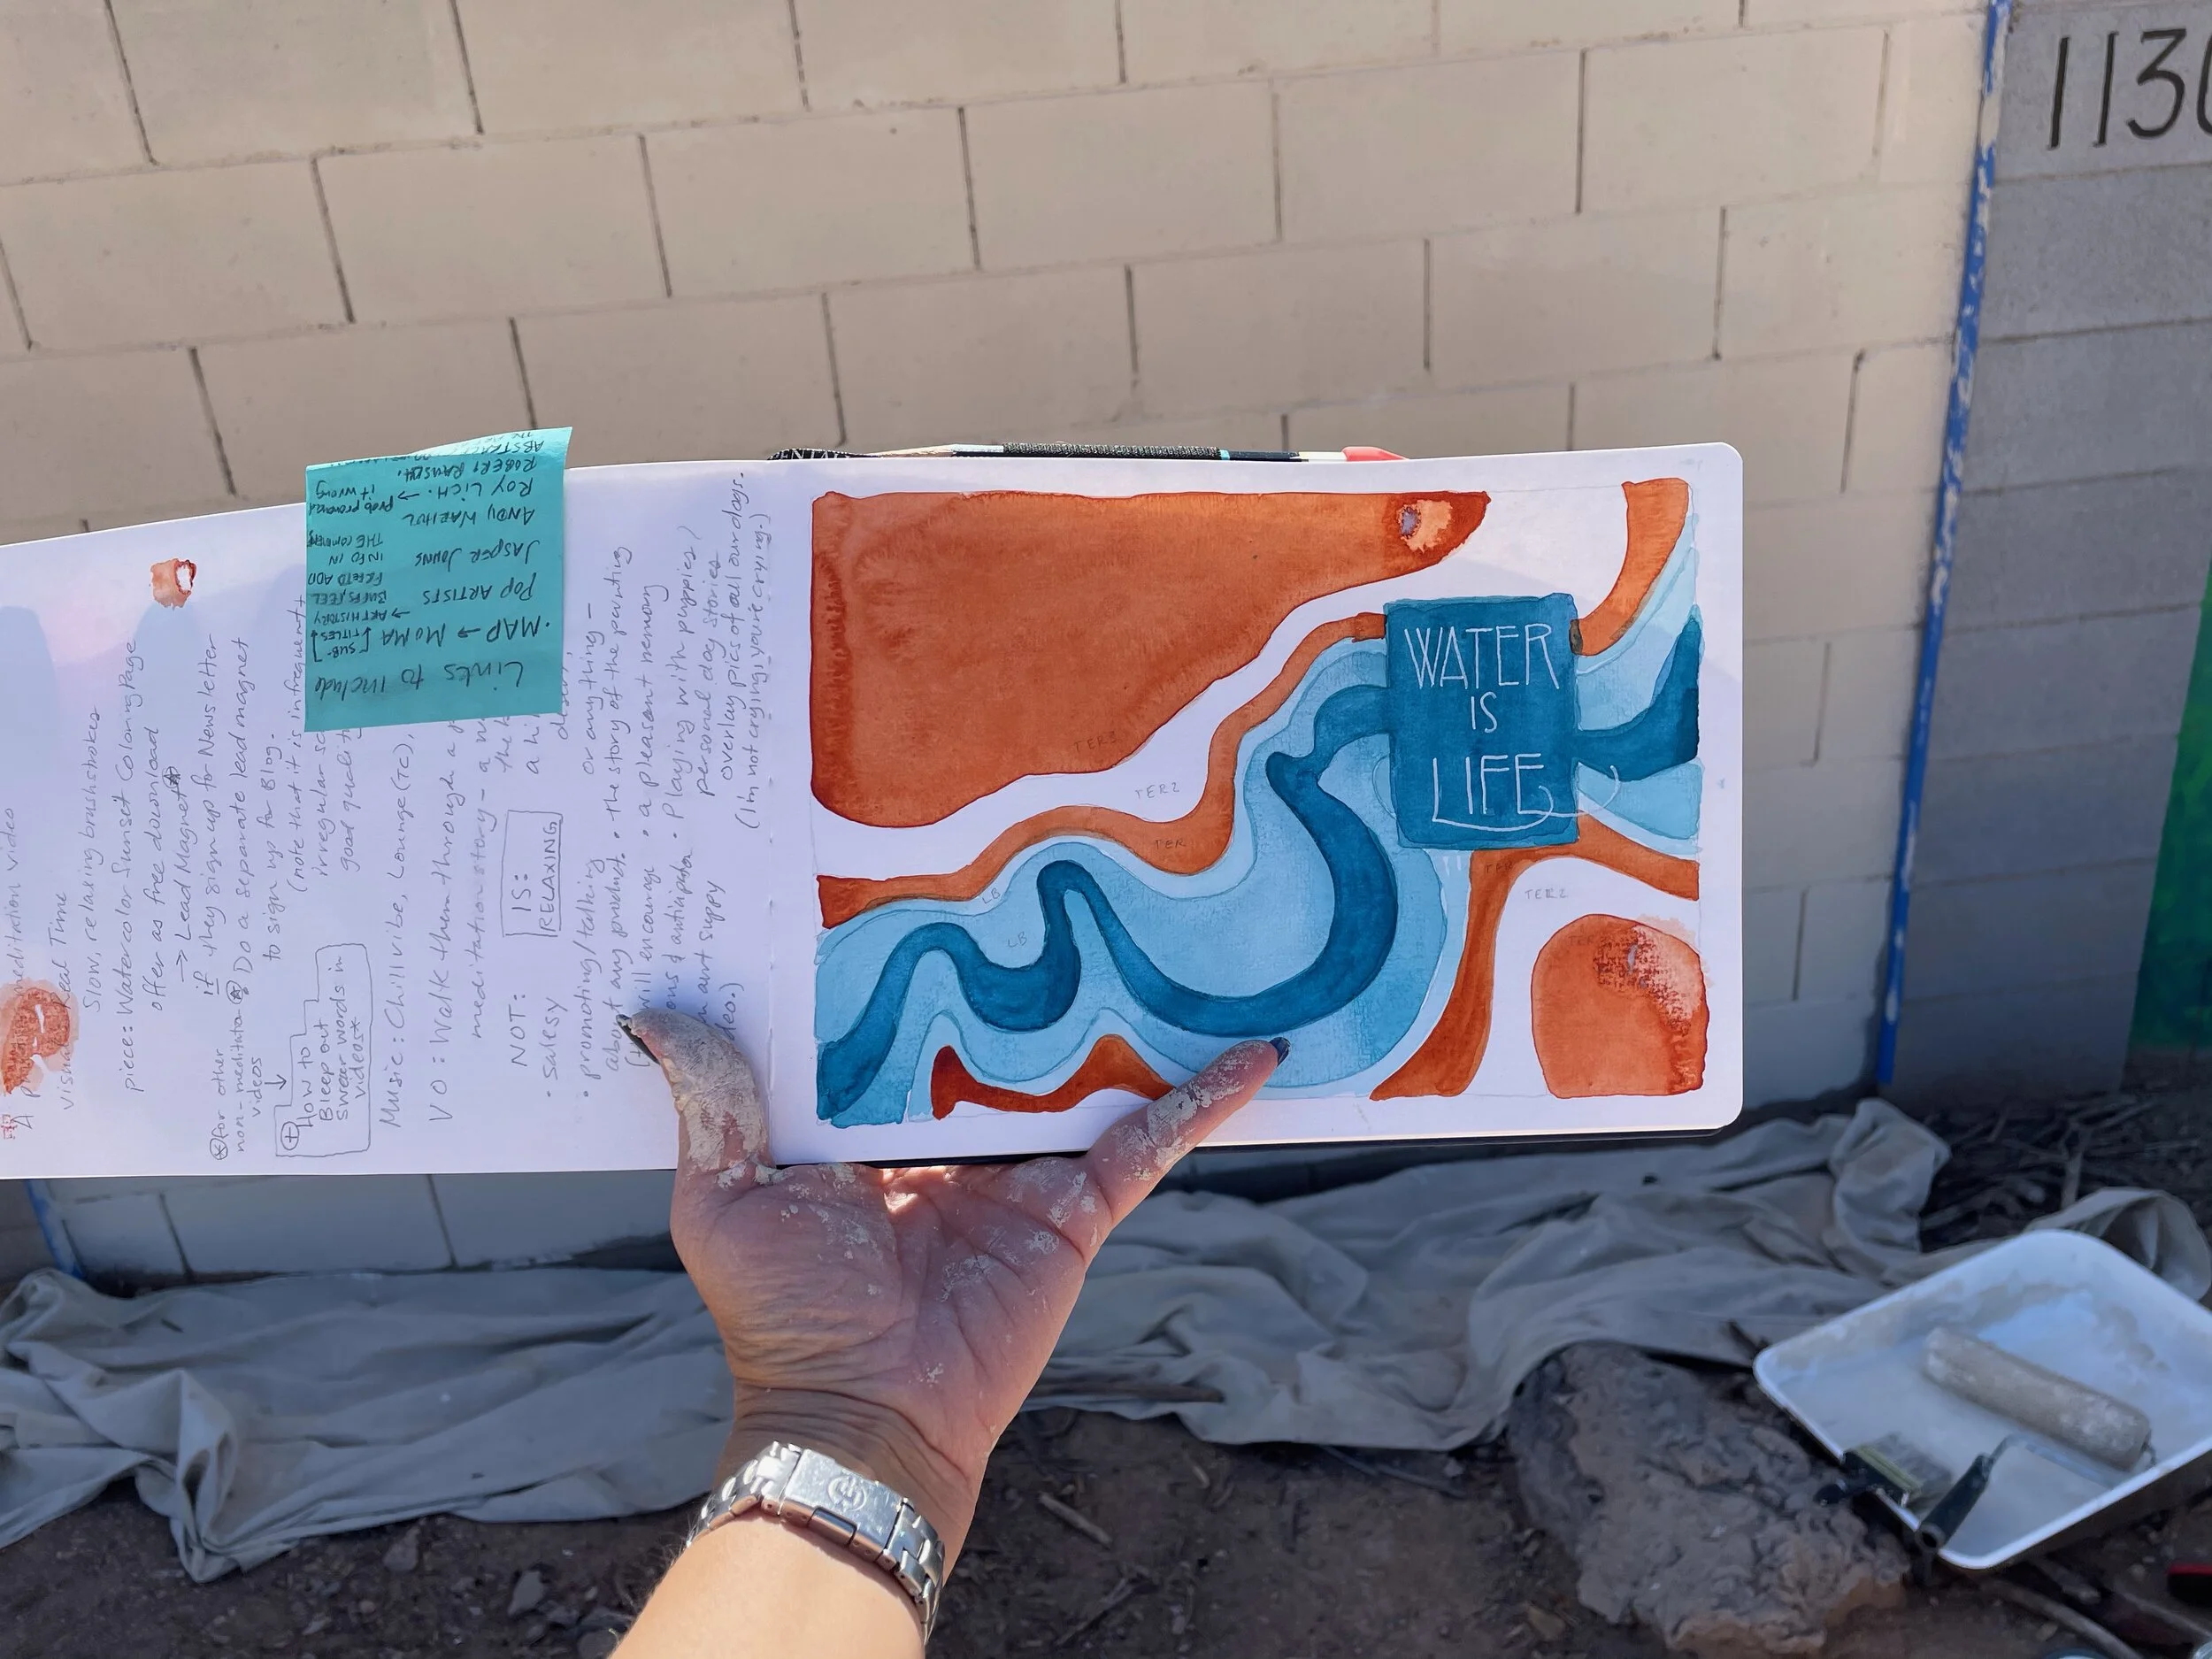
Watercolor sketch of the mural
2. Choose a Broad Color Palette
I knew I wanted the mural to be brighter and bolder than my watercolor sketch, so I went to Home Depot and chose a bunch of paint swatch cards. I chose way more than I needed, so that I could narrow them down.

I started out with over 25 colors!
3. Narrow down your colors
I initially chose a wide range of colors in the shades I wanted. I brought all of my swatch cards with me. This is one of the most important tips I can give you: choose your final colors ON SITE! The colors that were my favorites in the store were not the same ones that were my favorite when I brought them home; and then when I brought them to the mural site itself, they were completely different. The light and shadows of your mural site will be very different from the environment at the paint store, so if you can, pick a wide range of colors and narrow it down on site.

I used 3 shades of blue for water; and 3 shades of terracotta for the earth
4. Prime the Wall
Before you begin, you should make sure the wall is clean and dry. If it’s dusty, muddy, or covered in cobwebs, not only will your paint and brushes get dirty, but the paint won’t adhere to the wall properly. Spray the wall down and give it enough time to dry.
Paint the wall with a coat of primer. This can be a light neutral “one coat” exterior paint, or a primer paint like Kilz that will seal the block wall and kill any mildew. Block walls are very porous and soak up paint like crazy, so using a primer coat means that your colored paint will go further and provide more coverage. Also (not shown), bring a drop cloth. Even if, like here, the ground in front of the mural is just dirt, you still want to be respectful of the area and property and keep it clean.
(Note: All walls for the Phoenix Mural Project are donated with permission by the owners.)

Day 1: The block wall is painted with a coat of primer.
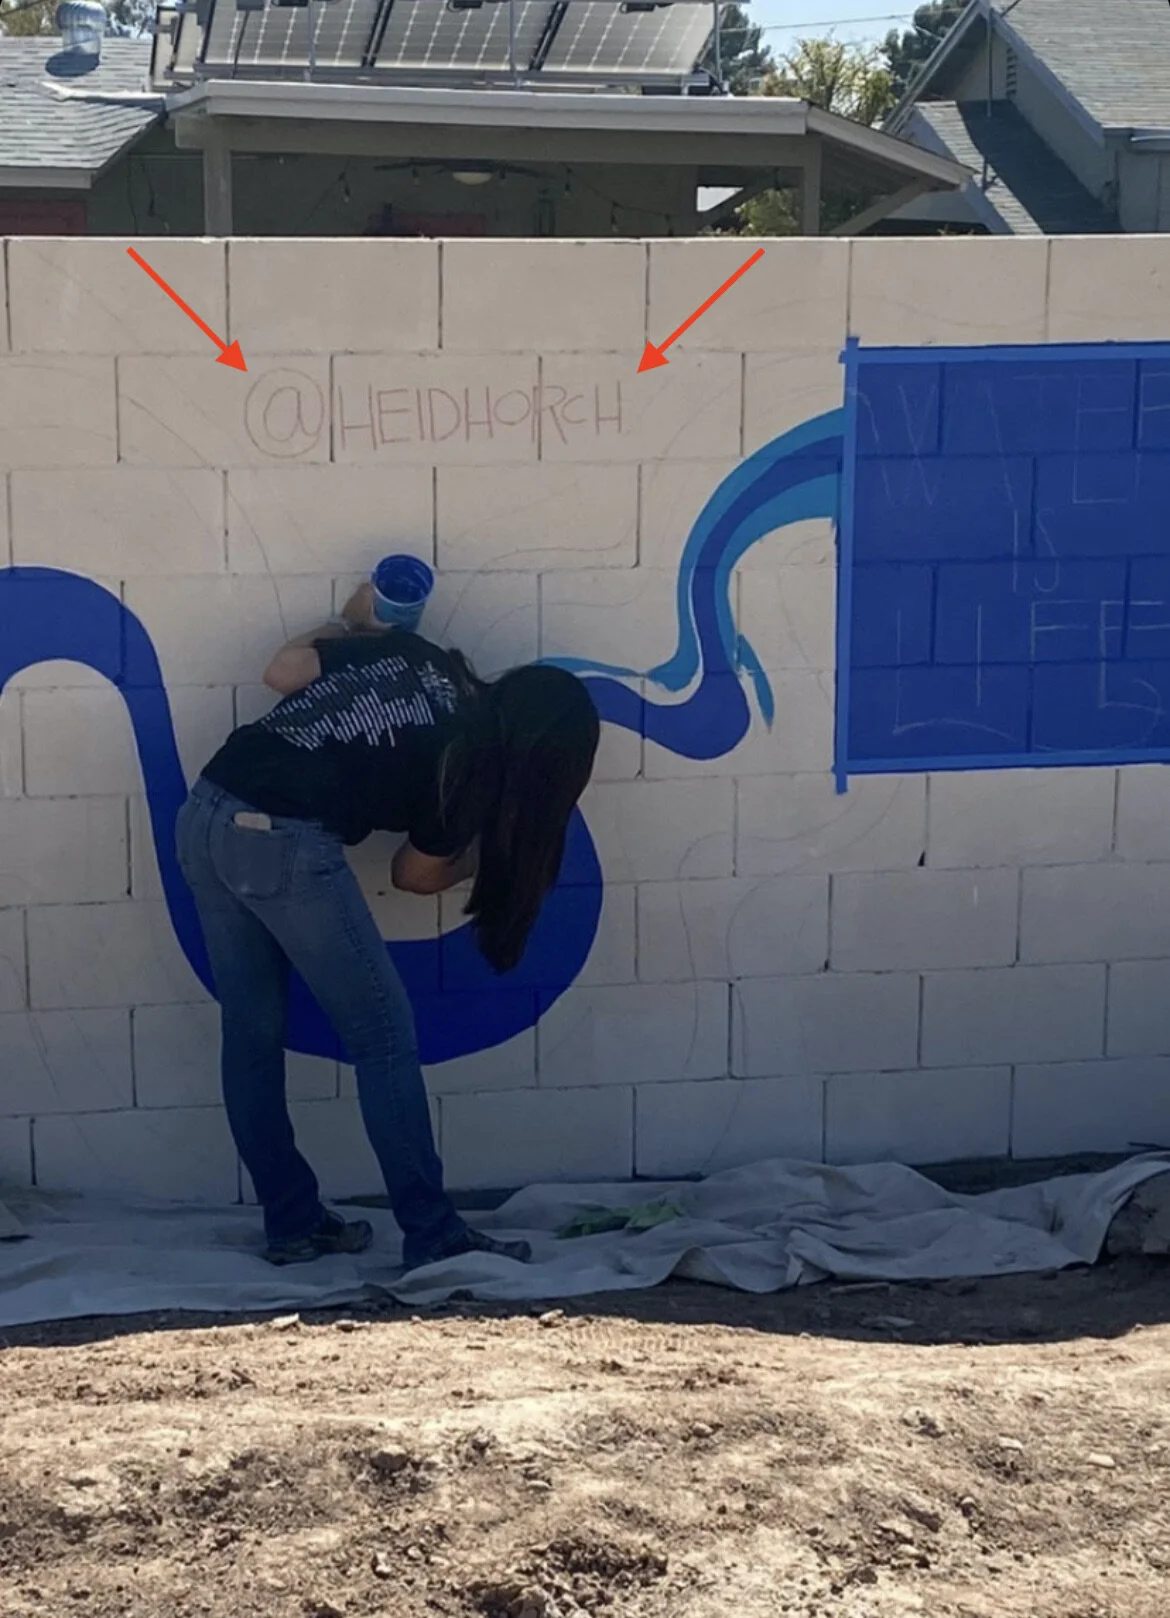
5. Use Chalk to Outline Your Mural onto the Wall
This design was fluid enough where I felt comfortable drawing it freehand onto the wall. If it were a more specific or intricate design, I’d prefer to use a projector or grid. I also used different colors to help me delineate the areas to be filled in.

6. Bring Extra Containers for Paint
I used disposable carry-out containers to hold my paint as I worked. It would be too much to walk back-and-forth to the main paint can in one spot; and, you don’t want to carry the paint can with you as you paint because A. they’re too heavy, and B. if you spill a whole can it’s gone, but if you spill a small cup, you’re still good.

This was originally a to-go container for hot & sour soup (yum)
7. Share your Social Media Handle
It’s probably going to take a while to finish, and usually you’ll stir up some attention as you work. If onlookers are curious, you can simply direct them to your social media handle that you’ve chalked onto the wall. This saves you the nuisance of having to spell it out over & over, and makes it easier for people to look you up if they are shy and don’t want to interrupt you.
ALWAYS sign your work legibly once the mural is complete as well! This way even after you’re finished, whoever sees your work can look you up! (Here’s my Instagram: http://www.instagram.com/heidhorch)
Tips for mural painting: share your social media handle
8. Get a Little Red Wagon
My mural site was about 3/4 of a mile from where I parked. Luckily I was able to borrow this heavy-duty pull cart (below) to drag my stuff back and forth to the truck. I threw all my supplies in a laundry basket, and used the basket to easily transfer everything from house-to-truck-to-cart-to-site.
9. Checklist of Supplies for Painting a Mural:
(not pictured)
paint cans
paint “key" can opener
stir sticks
extra containers (large to go cups, empty yogurt containers, etc.)
rags
chalk
paint brushes
paint rollers & tray
painter’s blue tape
drop cloth
step stool
a level
water for rinsing brushes (and a container to do so, another cup is fine)
equipment for filming/pictures
a radio or speaker
snacks and drinking water
also, dog treats aren’t a bad idea! (there were 2 dogs on the other side of my wall and they were’t too pleased about my presence)

Little (big) Red Wagon
10. Paint in Sections & Take Breaks
This wall wasn’t even that big as far as murals go, and it still took me 3 full days to complete. Give yourself a reasonable goal in a workable time period. Painting a mural is harder than it looks. If you’re not used to it, you’re going to get sore! Take a few breaks to have a snack, drink some water, and stretch.
Also, if your wall is textured and porous like this cinder block, it will take much longer to paint than a smooth surface. It takes effort to get the paint into all those nooks & crannies. This wall took waaaaay longer than I’d expected and I had to give myself a goal of when to call it a day.

Day 2: I painted the blue shades and blocked out the letters.
11. Use Painter’s Tape for Straight Lines
I used the lines of the blocks as guidelines for my lettering and a level to make sure nothing was crooked. Then I used blue painter’s tape to outline the letters, and painted the space in between. The paint does sometimes get under the tape, but after wards, I used a brush with the darker shade of blue to clean up the edges of the letters (in video below).

12. Take Lots of Pictures
Even if it’s cold, you’re tired, you look like a train wreck and you have paint in your hair. Plus it’s good to have step by step progress shots to document your work.


13. Be Patient
Hey, doing a mural is a lot of hard work. But, it’s fun, rewarding, it’s a great creative outlet, and it makes people happy! And it’s something you’ve been wanting to do. But just like every new experience, there will be things that go wrong, things that you didn’t expect, and at times you’ll feel a bit overwhelmed. But that’s ok. Because at the end of it, you’ll e able to say, “Look what I did!” You set a goal, did the work, and accomplished something. Then you can pat yourself on the back and go have a beer, ‘cause you earned it.

It all starts with an idea

For more ideas on finishing your outdoor patio space, read this article From Happy DIY Home: 9 Attractive Patio Surfaces.
Watch my mural Video!
The Finished Mural

Map to Mural
The canal has murals all along the walls on either side. There is a bike/skate concrete path on the north side of the canal. My mural is on the south side, where there is a walk/bike dirt path.
Map section is south of Camelback Rd & north of Indian School Rd ; west of 7th ave & east of 15th ave.
A= street parking in the neighborhood; B= shop/dine parking

If you visit my mural, it’s a great place to take a selfie! Tag me, and I’ll share it to my page!!
Thanks for your support! If you have any questions about my process, just ask.
xo
Heidi